How To Turn Off Storage Sense On Windows 10?
Windows 10 offers a new baked-in attribute known as Storage Sense. This new feature offers automatic deletion of temporary files generated by installed applications and removes the files that haven’t been used in the last 30 days from the Downloads folder or Recycle Bin folder.
The storage sense smartly analyses that the removal of the cached copies of data or temporary files will not hinder the processing of the present files as well as helps in making storage space for the future. If this feature is not benefitting you at all, you can permanently disable this attribute.
Alternatively, you can use registry cleaner for windows 10 to get in detail the storage space and the bugs leading to the slow processing of the system.
Storage Sense attribute on Windows 10
Storage Sense feature helps you in managing your disk storage space effectively and efficiently. You can customize storage space to enhance productivity. This article will explain to you simple ways to turn off Storage Sense in Windows 10.
➔ Method 1: Using Settings App
➔ Method 2: Through Registry Editor
➔ Method 3: Using Group Policy Editor
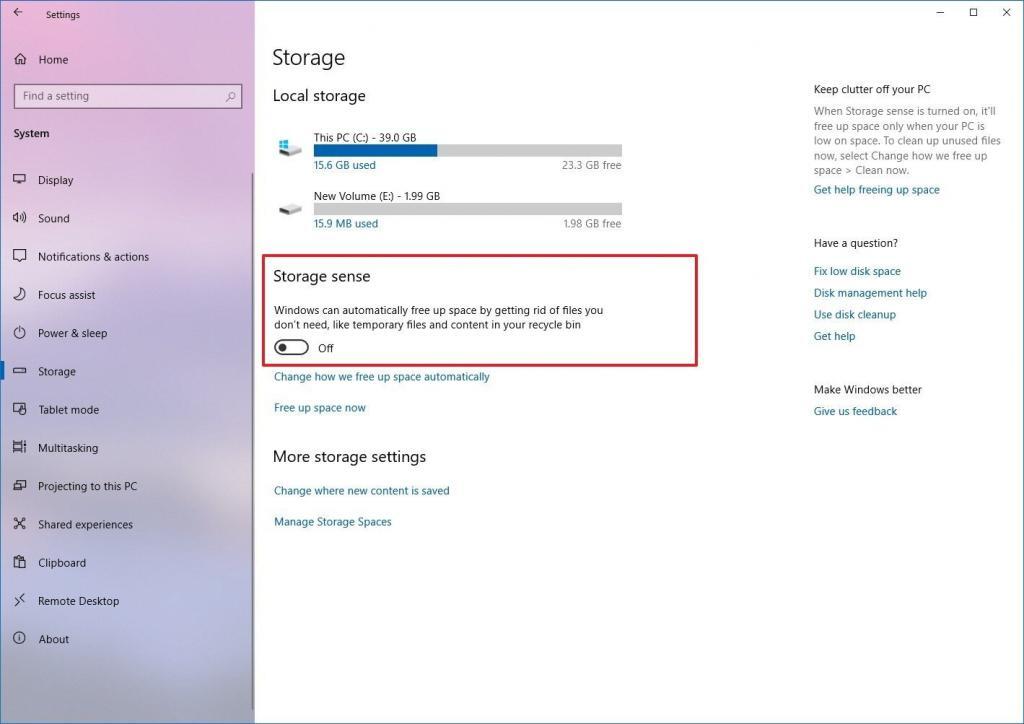
Method 1: Disabling Storage Sense in Windows 10 using Settings App
Step 1: Click on the Settings app to open the settings window.
Step 2: Select the System category in the displayed window.
Step 3: On the left-hand side pane, select storage. You can turn On the toggle switch by sliding it to the right side.
Step 4: If Storage Sense is turned off, deletion of temporary files will not take place.
In continuation with the same, there are two baked-in attributes in Windows 10 to prohibit access to Storage Sense. Using any of the two features, the option to turn on and off the storage sense and configure Storage Sense.
Method 2: Disabling Storage Sense in Windows 10 using Registry Editor
To turn off the Storage Sense in Windows 10 using another way, you need to make changes in the Windows Registry. If any wrong alteration is made in the registry this can lead to a huge loss of data on your system and this loss cannot be recovered. So, we advise you to make a backup of the Windows Registry before making any alterations to this option.
After successful completion of backing up of the Windows Registry, use the below steps:
Step 1: Use Windows + R key together on the keyboard to execute the Run dialog box.
Step 2: Enter Regedit in the Run dialog box and press OK. The registry page will be displayed.
Step 3: In the address bar on the Registry window, navigate through the address.
Computer\HKEY_CURRENT_USER\Software\Microsoft\Windows\CurrentVersion\StorageSense\parameters\StoragePolicy
Step 4: Alter the value 01 to 00 by double-clicking on the same, as a new pop-up window appears on the screen. Press OK.
Step 5:Now you can disable Storage Sense on Windows 10.
If you wish to enable the Storage Sense feature to the previous version, follow the above steps again, and at the end of Step 4 replace the DWORD value to 01 instead of 00.
Method 3: Disabling Storage Sense in Windows 10 using Group Policy Editor
This feature of disabling Storage Sense in Windows 10 using Policy Editor is present in Pro and Enterprise editions of Windows 10 and not for Home edition users of Windows 10. Users of the Home edition, to avail the benefit of this attribute, users are required to add Group Policy to the Home edition.
Follow these steps to disable storage sense:
Step 1: For Opening Group Policy Editor, click on the Search box, enter the gpedit in the box, and hit the Enter key.
Step 2: Access the Storage Sense folder by navigating through the path
Computer Configuration > Administrative Templates > System > Storage Sense
Step 3: By double-clicking on the Storage Sense, in the right-hand side pane.
Step 4: Select the Disabled option in the storage sense and click on OK.
This will disable Storage Sense immediately.
To access again into Storage Sense, use the above-mentioned guidelines, and click on the Not Configured option available. To save the made changes click on OK.
Conclusion :
In this article, we have explained multiple ways to turn off storage sense on Windows 10. These were the best 3 ways to disable storage sense on Windows 10 on the computer. We hope you managed to turn off this attribute with the help of the above-mentioned steps. If any of them worked for you, do not hesitate to leave some feedback by commenting in the section below.